In Article, we will let you know how to set up Google Ads Conversion Tracking for Thank you page when Forms Submission take place with Google Tag Manager.
If you are not familiar with Google Tag Manager then I would suggest you to watch our Video first so that you can be well aware of the Interface of Google Tag Manager.
Basically there are two Methods to track Google Ads Conversion
- Thank you, Page Google Ads Conversion Tracking using Google Tag Manager: After submitting, it sends user to thank you, Page, Tracking for this kind of form can be easily setup which we will explain you in details in this article.
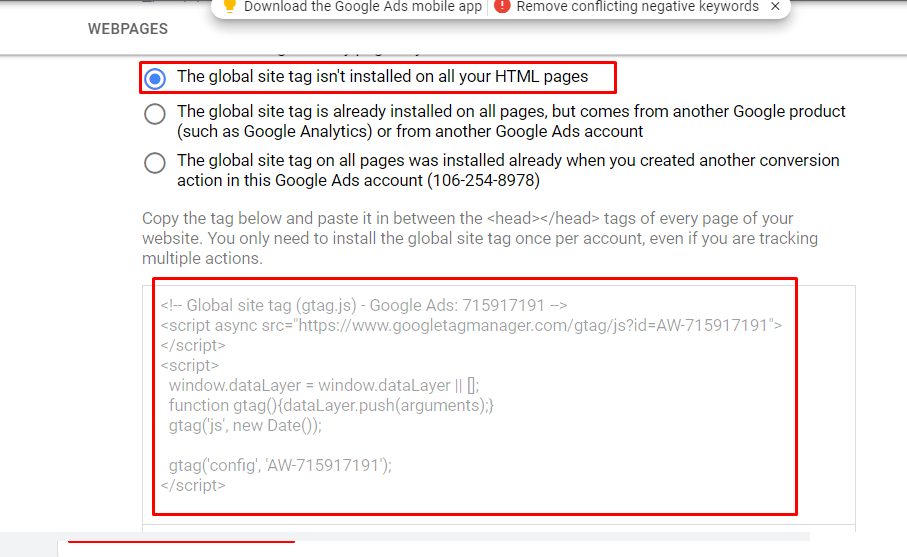
- Track Conversions by adding Conversion Code in Thank you, Page : If you have backend access of your website, you can simply add Google ads Conversion tracking code in Thank you Page in the <head> section of your HTML code
So let start learning Step by Step 1st Method.
How to Setup Thank you, Page Conversion Tacking in Google Ads With Google Tag Manager (GTM)
Step 1: Login to your Google Ads Accounts
Step 2 : Select Tool and Setting – Measurement – Conversion from the top navigation of Google Ads accounts
Step 3 : Click on Pulse sing to create a new Conversion Tag. Select the Below thing
Category – Submit Form Lead
Click-through conversion window – 90 Days
View-through conversion window – 30 Days
Include in “Conversions” – enable the Checkout Tick mark
Attribution model – Last Click
So make sure all the setting for Conversion tags should be as given above.
Step 5 : Open a new tab in your browser and login on your Google Tag Manager Account
If you don’t how to setup Google Tag Manger , please go througth this first.
Step 6 : Create a new tag by clicking on Tag Section of Left Navigation and
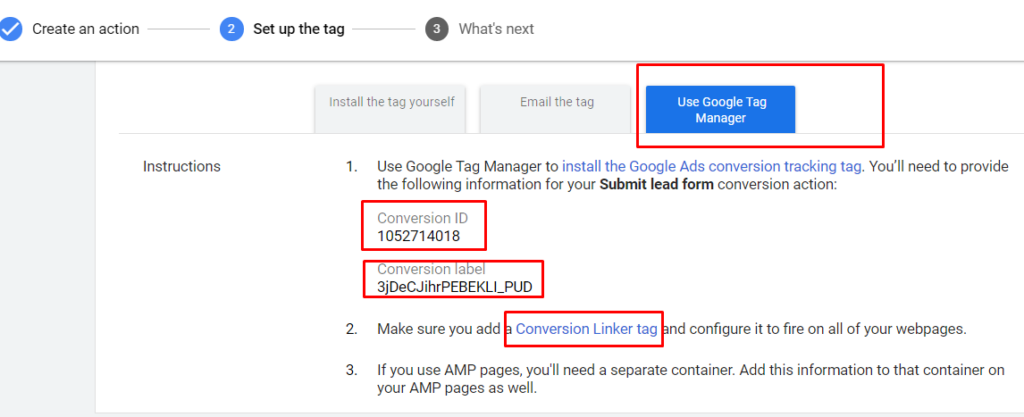
a popup will open and select Google Ads Conversion Tracking
Conversion ID – Please add the conversion ID and Conversion label from Google Ads account a Marked in Screenshot for step 4

Step 7 : Click on Trigger to Create a new Trigger and click on Plus sing in top right
Step 8 : In Trigger Configuration, Select Page View
The select the Some Page Views From the Radio option button
and Set the condition as shown in below Snapshot
Please note: Make sure you add thank you page URL of your website, Thank you page is the page where user lands after successful submission of Form
Save the Trigger with any name which is easy for you

Step 9: Conversion Linker: Make sure we, Create and Trigger the Conversion linker tags in all pages. This is important else our tracking will not work with GTM Method.

Step 10 : Save the Tag and Publish the Tag from top -right navigation which is very important else your Tag will not be work
Step 11 : All done! Now it’s Time to Test our Tags with Preview mode of GTM to make sure they are working fine or not. You can Learn the same how to Debug the Conversion tag in Preview mode of Google Tag Manager
For the 2nd Method
Track Conversions by adding Conversion Code in Thank you, Page : If you have backend access of your website, you can simply add Google Ads Conversion tracking code in Thank you, Page in the <head> section of your HTML code
Step 1: Follow the Step 1 – Step 3 from above given in first Method.
Step 3 : All done! Now it’s Time to Test our Tags with Preview mode of GTM to make sure they are working fine or not. You can Learn the same how to Debug the Conversion tag in Preview mode of Google Tag Manager
If you have any query regarding conversion tracking, do let us know, we will help you to sort those issue.